Optimize Pro Tools: Marker Colors
Feb 19, 2010If you are a Pro Tools user, you may find yourself taking advantage of the markers feature in the Edit window. Markers can be used for many things, but one thing they let you do is notate where each section of the song starts and ends (i.e. Verse 1, Chorus, Outro). I find this extremely helpful especially when recording another band whose songs I’m not as familiar with. Once we setup the guide track, we go ahead and put markers in so I know where to punch in and out as needed.
Seeing In Color
What I find very helpful however is to switch on the color option for these markers. It helps me see even quicker where the song changes. Let me show you what I mean. When you insert markers into your session normally, this is what they look like, gray and dull:

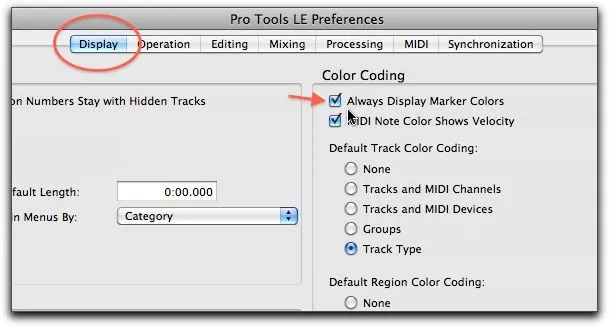
The first thing you need to do is go to your Preferences window. Simply click on Setup from the menu bar and choose Preferences.

Make sure you have the Display tab selected. On the right there is a section labeled “Color Coding”. Simply check the first box labeled Always Display Marker Colors and you’re done.
Close out of the preferences and flip back over to the Edit window and voila! You now have beautiful colors in between the markers, helping you identify sections of the song with a brief glance.

It’s The Little Tweaks
I know it sounds simple, but this one minor tweak can help speed up your workflow exponentially over time. And every minute and ever second you can get back by having a streamlined process and interface in Pro Tools is time you can spend on other things like mixing or trying something creative that would otherwise be a time waster.
Discover The 6 Steps for Creating a
Radio-Ready Song from Scratch"
Enter Your Email Below To Receive The Free 17-page PDF,
"6 Steps To A Radio-Ready Song"
We hate SPAM. We will never sell your information, for any reason.
