Optimize Pro Tools: Tweak Your Import Settings
Jan 27, 2010Depending on how you work with Pro Tools you may end up importing a lot of files into any given session. These could be drum loops, tracks from another session, or sound effects from an external sound library. Whatever the case may be, when you import audio into a Pro Tools session you want to have a few import settings in place to insure you get not only the best possible quality of conversion (if your audio requires it) but also the best file structure so you don’t lose anything down the road.
It’s All In Your Preferences
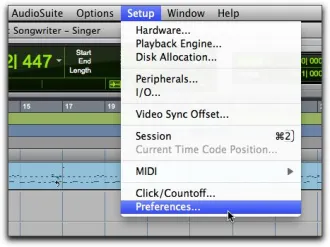
Pretty much everything you can tweak in Pro Tools is done from the Preferences box. You want to become very familiar with this as you dive deeper into this program. To access the Preferences in Pro Tools simply navigate to the Setup menu and choose Preferences.
 You’ll see a dialog box with a handful of different tabs up top. Here is where you can change anything from the colors you see in the Edit and Mix windows to how long the clip indicator stays lit on your tracks. For now we want to click on the Processing tab.
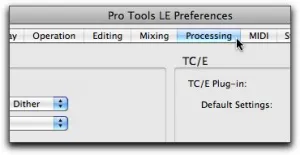
Keeping Things Where They Belong
Over on the left you’ll see a section called Import. Here is where you need to make just two brief adjustments. The first thing I highly recommend is that you make sure the box labeled Automatically Copy Files On Import is checked. This tells Pro Tools to do exactly what it says. By default, when you import audio into your session, Pro Tools is simply playing that audio from where it is on your computer. If the file is deleted at some point, then it will no longer show up in your session. That is not cool, trust me on this one.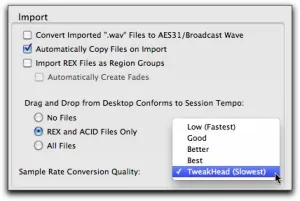
Instead check that box so that the next time you import something it will put a copy of it in your sessions Audio folder, allowing it to stay nice and safe with all your other recorded audio. This is especially important when backing sessions up. You want all your audio to be there in one place.
Choose Your Quality Bar
The very last option in the Import section is the Sample Rate Conversion Quality. Some imported files may come in a different sample rate from the one you’re using in your session. A drum loop, for example, may have been recorded at 48khz but your session may be at 44.1khz. Pro Tools has to convert the loop in order for it to play at the right speed. This menu determines how good that conversion is.
There is a drop down to the right that gives you a handful of options. Just choose TweakHead and be done with it. It doesn’t matter that it’s the slowest since this is a one time conversion to get the audio into your session.
One and Done
That’s pretty much it. Once you’ve made these switches in your preferences, Pro Tools will remember them for each session you create on that computer. You don’t even have to remember what you learned today once you’ve done it! It’s a one and done deal as I like to say. Enjoy!
Discover The 6 Steps for Creating a
Radio-Ready Song from Scratch"
Enter Your Email Below To Receive The Free 17-page PDF,
"6 Steps To A Radio-Ready Song"
We hate SPAM. We will never sell your information, for any reason.
